
Preventing Bubble Formation in Epoxy Floor: Causes, Fixes, and Pro Tips

Introduction
Epoxy flooring has become a staple in Nigeria’s construction and industrial sectors. Whether it’s a hospital corridor, commercial kitchen, warehouse floor, or even a residential space, epoxy floors are praised for their glossy finish, chemical resistance, and long-lasting durability. However, a common challenge that plagues even the most professional installations is bubble formation, those annoying blisters or air pockets that appear during or after the epoxy has cured.
Bubbles not only ruin the aesthetic appeal of your floor, but they can also weaken the bond between the epoxy and the concrete substrate, ultimately compromising the floor’s durability and performance. In humid climates and environments with temperature fluctuations like many parts of Nigeria, bubble formation is an even bigger threat.
This guide will walk you through why bubbles form in the first place, how to prevent them using best practices, and what to do when they still appear despite your best efforts. If you’re a contractor, facility manager, or DIY homeowner, this article will save you time, money, and stress on your next flooring job.
Key Takeaway
-
Surface Prep is Everything – Improper cleaning, dust, or moisture in the substrate is the #1 cause of epoxy bubbles. Always start with a dry, contaminant-free surface.
-
Control Temperature & Humidity – Apply epoxy in recommended climate conditions to avoid trapped moisture and air expansion.
-
Mix Slowly, Not Aggressively – Rapid mixing introduces excess air into the resin, which can lead to bubbles after application.
-
Use a Primer Coat – Primers seal porous surfaces and prevent air from escaping into the epoxy layer.
What Causes Bubbles in Epoxy Flooring?
To prevent bubbles, you first need to understand their root causes. Bubbles don’t happen by accident; they result from specific interactions between the epoxy material, the substrate, and the environment. Here’s a breakdown of the most common culprits:

Pre-Application Surface Preparation
Preparation is 70% of epoxy floor success. If you skip or rush surface prep, even the best-quality epoxy will fail—and bubbles will almost certainly appear.
Moisture Testing
Never apply epoxy to a floor that hasn’t passed a moisture test.
Recommended Methods:
- Calcium Chloride Test – measures moisture vapor emission rate
- Relative Humidity Probe – inserted into drilled holes in the concrete
- Red Flag: A “dry-looking” floor can still contain moisture that causes bubbles once sealed.
Concrete Curing Time
Concrete should cure for at least 28 days before epoxy is applied. If applied too early, moisture and gas will rise through the pores, causing blistering and delamination.
Cleaning and Grinding
Use a floor grinder with a diamond head to remove:
-
Surface laitance
-
Grease or oil spills
-
Paint or previous coatings
-
Dust and loose particles
Vacuum thoroughly after grinding to ensure a clean substrate.
Priming the Floor
Applying a penetrating epoxy primer seals the surface, reduces outgassing, and promotes adhesion. In Nigeria, Epochem Epoxy Primers are available through Tikweld and Epoxy Oilserv distributors.
Proper Mixing Techniques
Mixing is where most bubble problems begin.
-
Use a low-speed drill with a paddle mixer (avoid handheld or stick stirring).
-
Mix the resin and hardener according to the manufacturer’s ratio (e.g., 2:1 or 3:1).
-
Stir slowly for at least 3–5 minutes, scraping the sides and bottom.
-
Let the mixture sit for 1–2 minutes after mixing (this helps bubbles rise to the top).
-
Never over-mix or stir rapidly; you’ll introduce air into the blend.
Pro Tip: Some brands allow the addition of an anti-foam additive, especially in humid zones or where heavy coating is used.
Best Application Practices to Prevent Bubbles
Even with perfect preparation and mixing, poor application techniques can still cause bubbles to form. Here’s how to avoid them:
Use the Right Tools
-
Notched Squeegee: Spreads epoxy evenly and helps control thickness.
-
Spiked Roller: Essential for releasing trapped air within the coating after application.
-
Avoid Foam Rollers: They can trap and release air into the surface.
Timing Is Everything
-
Apply epoxy during cooler parts of the day—early morning or evening.
-
Avoid direct sunlight on the substrate during application; high heat accelerates curing and traps bubbles.
-
Work within the epoxy’s pot life (the usable time before it begins to harden).
Layer Thickness
-
Avoid overly thick pours; thick layers trap more heat and air.
-
If a thicker finish is desired, build up in multiple thin coats.
Use of Spike Roller
-
Pass the spike roller over the entire surface 10–15 minutes after pouring.
-
Repeat as needed during the early curing stage to release rising bubbles.
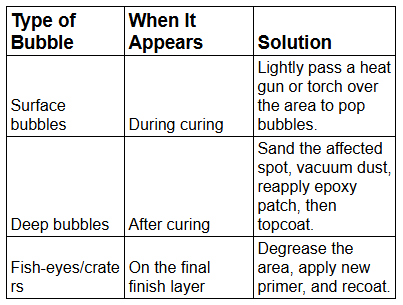
Bubble Troubleshooting & Fixes
Sometimes, despite best efforts, bubbles still appear. Here’s how to fix them based on when they show up:
Pro Tip: For large-scale installations, have a second worker dedicated to spotting and fixing bubbles during the application process.
Preventing Bubbles in Nigeria’s Climate
Nigeria’s tropical climate—characterized by high temperatures and humidity—can increase the likelihood of bubble formation. Adjusting your process to suit these conditions is crucial.
Work in Cooler Conditions
-
Schedule epoxy installations in the early morning or late evening.
-
Avoid midday work, especially on sun-heated concrete surfaces.
Climate Control for Indoor Jobs
-
Use portable AC units, dehumidifiers, or fans to maintain optimal working conditions indoors.
-
Target humidity below 70% during application and curing.
Adjust Mixing and Application Speeds
-
In hot conditions, mix smaller batches to reduce the chance of premature curing.
-
Work in shorter sections to maintain control over bubble spotting and removal.
Local Product Selection
-
Choose epoxy products formulated for hot and humid climates.
-
Brands like Epochem offer epoxy systems tailored for Nigeria’s weather patterns.
Frequently Asked Question
1. Why do bubbles appear even after priming?
Even with a primer, bubbles can form if the substrate is still releasing moisture, the temperature is too high during application, or air was introduced during mixing.
2. Can I fix bubbles after the epoxy has fully cured?
Yes. Sand down the affected area, clean it thoroughly, reapply a thin coat of epoxy, and finish with a seal coat for uniformity.
3. What’s the best roller to use for epoxy application?
A spiked roller is the industry standard for removing trapped air during application. For applying primer or base coats, use a lint-free, short-nap roller.
4. How long should I wait between primer and topcoat?
This depends on the manufacturer’s instructions, but generally between 4–24 hours. Waiting too long can require additional sanding for proper adhesion.
5. Is bubble formation more common in self-leveling epoxy?
Yes, because self-leveling systems often have a thicker pour, which can trap heat and air. This makes the use of a spike roller and proper climate control even more critical.
Conclusion
Bubble-free epoxy flooring is a result of preparation, technique, and timing. By understanding the root causes of bubbles—from substrate moisture to improper mixing—you can prevent them before they occur. Proper surface prep, using the right tools, working in controlled conditions, and adapting to Nigeria’s hot and humid climate are the pillars of a flawless epoxy installation.
A smooth, glossy, and durable epoxy floor is more than just visually appealing—it also guarantees the longevity and performance expected from a professional-grade installation. Contractors, facility managers, and DIY users alike should treat bubble prevention as a top priority, not an afterthought.
Ready to achieve perfect, bubble-free epoxy floors?
Get Epochem epoxy floor systems, professional-grade tools, and expert guidance from:
-
Epoxy Oilserv Nigeria – Nationwide delivery & technical support
-
Tikweld Welding Supplies & Services – Complete flooring solutions
-
GZ Industrial Supplies – Premium epoxy products & accessories
Need instant advice? Chat with our flooring specialists on WhatsApp today.
Click Here to Chat
Newest Guide & Blog Updates

Lithium Grease in Nigeria: Types, Applications & Buying Guide for Industrial Use
Introduction Industrial machines, heavy equipment, vehicles, and factory systems across Nigeria depe...

Top Welding Machine Suppliers in Nigeria for Industrial Projects
Introduction Nigeria’s industrial sector continues to expand across construction, oil and gas, marin...
 – Arc, Inverter & TIG Welders")
Welding Machines for Sale in Nigeria (2026) – Arc, Inverter & TIG Welders
Introduction In Nigeria’s fast-growing construction, fabrication, oil & gas, and maintenance sectors...
")
Where to Buy Epoxy Flooring Materials in Nigeria (Updated 2026 Guide)
Introduction Epoxy flooring has become a go-to solution for many industries in Nigeria due to its un...

GZ Industrial Supplies Moves Dei-Dei Abuja Showroom to Kubwa for Better Access to Contractors and Industrial Buyers
PRESS RELEASE Abuja, Nigeria – 4th January 2026 — GZ Industrial Supplies Ltd, a leading supplier of...

Top 10 Power Tools Every Workshop in Nigeria Needs in 2026
Introduction In 2026, Nigerian workshops from car repair garages in Lagos to metal fabrication shops...